
Two editors can cut the same wedding from the same footage and deliver films that look a generation apart — and the difference is almost always the grade. Wedding video color grading is what turns flat, mismatched clips into a warm, cinematic film a couple wants to watch for decades. This guide walks through how to do it properly, from correction to final look.
Why wedding video color grading is uniquely hard
No other genre throws this much at a colorist in a single day. You move from dim hotel rooms to a sunlit ceremony, into a candlelit church, then a reception lit by warm tungsten, LED uplighting, and a DJ’s color wash — often within the same five-minute sequence. On top of that, skin tones must stay flattering for every guest and, above all, for the couple. Good wedding video color grading is the discipline of making all of that feel like one consistent film.
Correction first, grading second
These are two different jobs and doing them in the wrong order wastes hours. Color correction is technical: balancing exposure, fixing white balance, and matching every shot so the footage is neutral and consistent. Color grading is creative: applying the look — the warmth, contrast, and mood — on top of that clean base. Always correct and match first; if you grade before the shots are balanced, every lighting change forces you to redo the look.
Step 1: Balance and match your shots
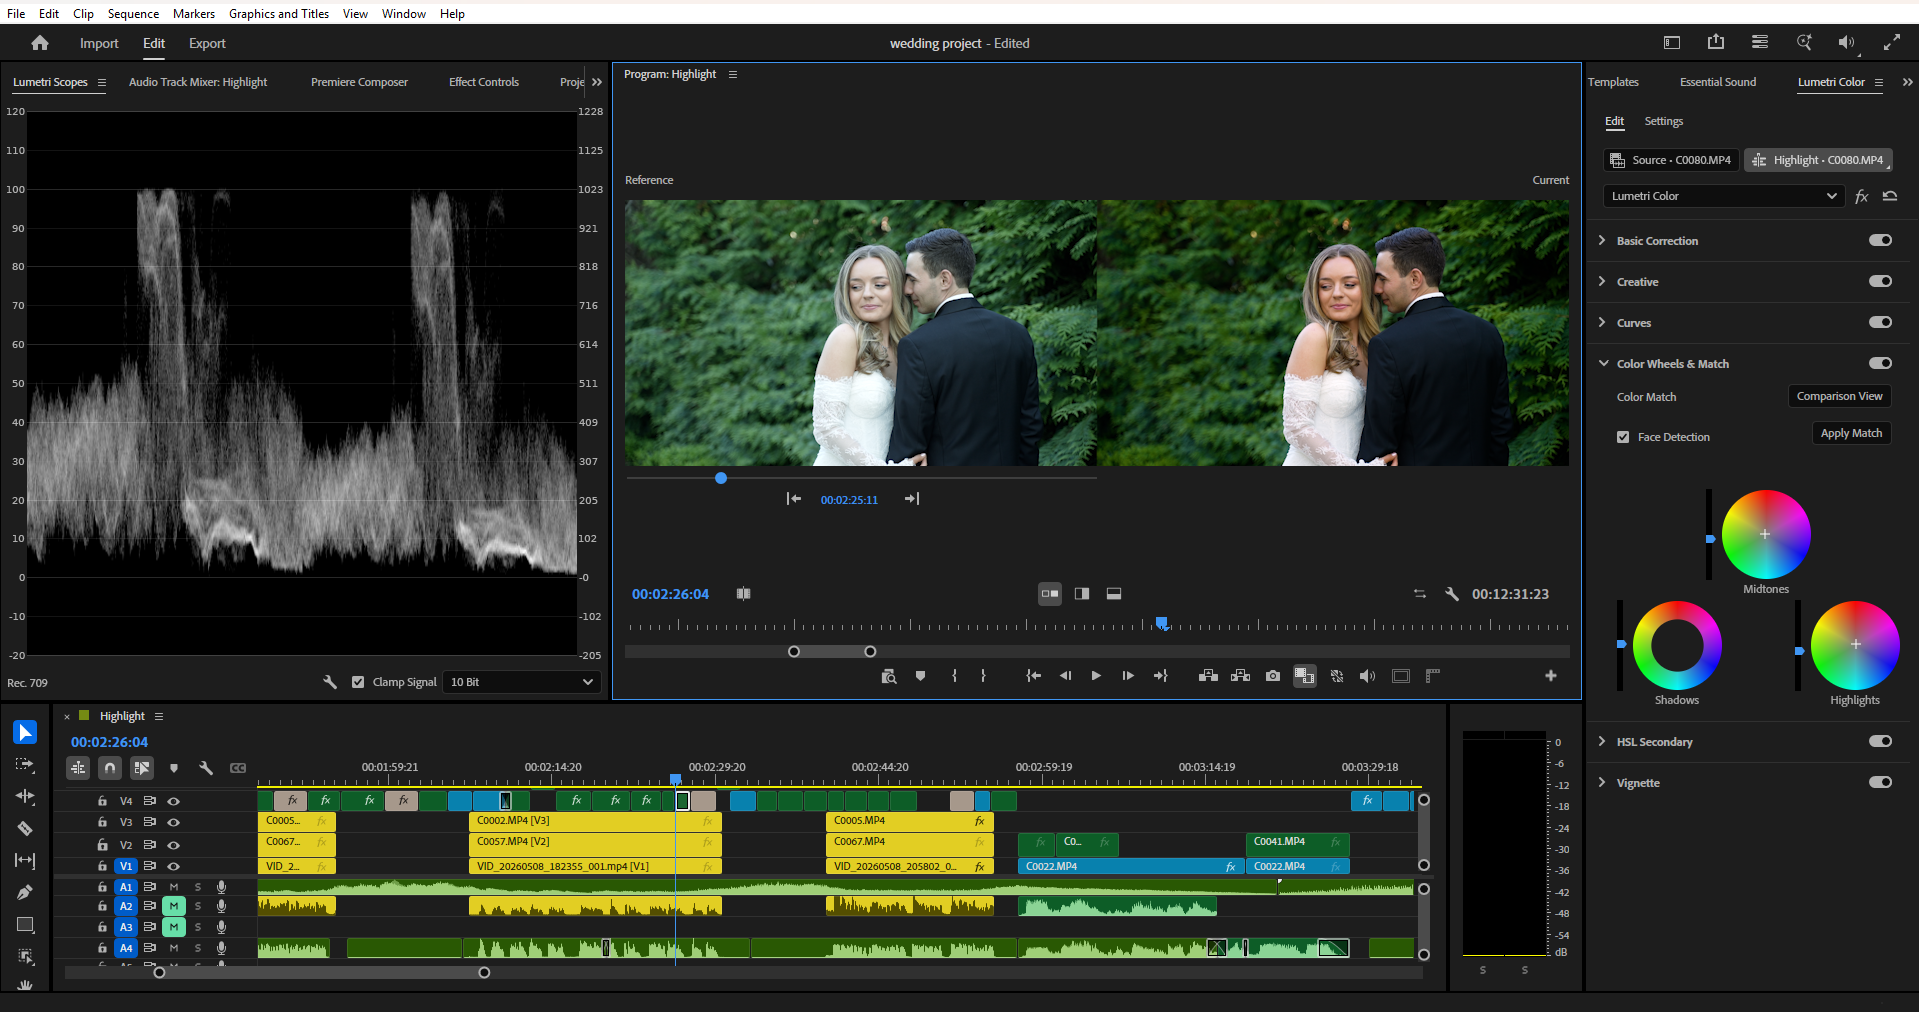
Start with a primary correction on each clip — set exposure so highlights aren’t clipping and shadows aren’t crushed, then neutralise white balance. The real test is matching within a scene: in a multicam cut, nothing breaks immersion faster than one angle reading warm and the next cold. Use the Lumetri Scopes, not just your eyes — monitors lie, the waveform and vectorscope don’t. Match the cameras to each other before you move on.
Step 2: Protect skin tones above everything
Skin is the one thing viewers judge instinctively. On the Lumetri vectorscope, healthy skin tones sit along the skin-tone line; keeping them there across every shot is the single biggest quality signal in wedding video color grading. Whatever creative look you apply, pull skin back toward natural. Keep the dress clean and white too — it is the visual centerpiece of the day, and a colour cast on the gown is the first thing a bride notices.
Step 3: Build a consistent creative look
With a balanced base, apply your look. Most wedding films suit a warm, soft, slightly lifted palette — romantic rather than clinical. Build it with curves and a touch of saturation control rather than slamming a heavy LUT over everything. Save the result as a Lumetri preset, or drop it onto an adjustment layer above the timeline so it carries across the whole film in one move. Consistency is the goal: the look should feel like a deliberate signature, not a different mood every cut.
Handling mixed and difficult lighting
Receptions are where grades fall apart. Color-washed dance floors throw magenta and blue across skin; mixed tungsten and LED sources fight each other in the same frame. Tackle these with Lumetri’s HSL Secondary — key the skin tones and correct them separately from the background, so you can leave the party lighting moody while keeping faces natural. For low-light footage, manage noise before you grade, because lifting shadows on a noisy clip amplifies every bit of grain.
The tools: Lumetri Color and scopes
For colour specifically, DaVinci Resolve is the industry standard — a dedicated grading application with the deepest toolset, and its free version is genuinely capable, so it is worth knowing if you ever want to push a grade further than an editor normally would. That said, Premiere Pro’s Lumetri Color panel handles wedding video color grading comfortably without ever leaving your timeline — basic correction, curves, colour wheels, HSL secondaries, and the Lumetri Scopes for matching, all in one app. Adobe’s own color grading overview for Premiere Pro walks through each section of the panel. Whichever you reach for, keep the scopes open so you are matching to the waveform and vectorscope rather than an uncalibrated monitor, and treat LUTs as a starting point to adjust, never a one-click finish.
Common grading mistakes to avoid
The usual culprits: orange, sunburnt skin from overcooked warmth; a heavy teal-and-orange look that flatters cars but not brides; crushed blacks that swallow detail in a dim church; and inconsistent matching that makes a multicam ceremony jump around. Almost every one traces back to grading before correcting, or trusting an uncalibrated monitor instead of the scopes. Fix the process and the mistakes mostly disappear.
When to outsource your color grading
Grading a full wedding properly — correcting, matching, secondaries, and a consistent look across every clip — takes hours, and it is detailed, fatiguing work that does not scale when your calendar is full. If color is the stage where your edits bottleneck, it is a natural one to delegate to a specialist.
At Love Story Editing we grade every film to this standard as part of our wedding video editing service. Choose the package that fits — a teaser edit, a ceremony edit, or a full wedding film. See the look on our video portfolio, or request a quote.
The takeaway
Strong wedding video color grading comes down to order and restraint: correct and match before you create, protect skin tones above any creative choice, build one consistent look, and trust your scopes over your monitor. Get those fundamentals right and your films gain the polish couples remember — and when the grade becomes the bottleneck in your workflow, it is an easy stage to hand to a specialist so you can stay behind the camera.